I primarily write technical documents for educational or work purposes, but from time to time I also enjoy writing a blog post here. That’s why I invested some time to find an easy way of publishing blog posts on this site. Because I live most of my editing time in the Emacs world, my priority searching for a workflow was to not leave that world and stick with the workflow I already use for technical documents.

Why Emacs?
I experimented a lot with different editors in the past.
For some reason, Emacs is the one I stayed with the longest.
And by now I don’t think I’ll switch any time soon.
It’s still strange because there are many great editors out there.
Many of them even have significant advantages over Emacs.
Especially performance can be quite rough with Emacs from time to time.
The recently merged native-comp branch improves Emacs performance by a lot
but still isn’t comparable to a Sublime Text.
I listed some relevant editors that came to mind and a subjective summary of my experience with them.
VIM
A notorious competitor of Emacs but with, in my opinion, way better keybindings and cursor movement.Sublime Text
Sublime Text offer blazingly fast code editing but is unfortunately closed source and therefore development can be slow at times.VS Code
Currently probably one of the best editors available. It gets massive support from Microsoft with countless great plugins and features. Unfortunately VS Code is Electron1/JavaScript based and therefore has a lot of overhead. But you can’t deny how great the out-of-the-box experience with VS Code is.Atom
Very similar to VS Code but with fewer features and also Electron1 based.various IntelliJ editors
Even when most of the text editors I listed above are great, Emacs provides me with some features I just can’t get with other editors. To give you a small example of which features I am talking about, I listed some below.
Org Mode
A pure text format comparable to Markdown, but with a much richer feature-set.Magit
A Git client that enables by far the fastest Git-workflow I have ever experienced in any other editor.
Latex
Because I like the simplicity \(LaTeX\) provides me while writing technical documents. But writing pure \(LaTeX\) isn’t always fun to work with. Instead, using the Emacs major mode Org-Mode offers us a Markdown like writing experience while still providing the ability to export to \(LaTeX\) (or PDF) or write \(LaTeX\) directly.
Citations are also of high importance for technical writing.
\(LaTeX\) of course supports citations via packages like bibtex or natbib.
I use Zotero to manage my publication bibliography.
If you want to use Zotero in combination with bibtex the plugin Better Bibtex is a must-have.
The plugin allows you to export your Zotero bibliography to a .bib2 and most importantly keep both libraries in sync.
To enable support for citations in Org-Mode, we can either use the native org-cite package or (my personal choice) the awsome org-ref package.
Blogging
Org-Mode also supports the ability to directly export to a Markdown flavor that is compatible with the Hugo Web Framework.
This allows me to write technical documents and export them to PDF (through Latex) while retaining the ability to publish them to my blog.
All the citations and footnotes are still intact, and no further configuration is required to export to a specific domain.
The Emacs package that allows us to do so is ox-hugo.
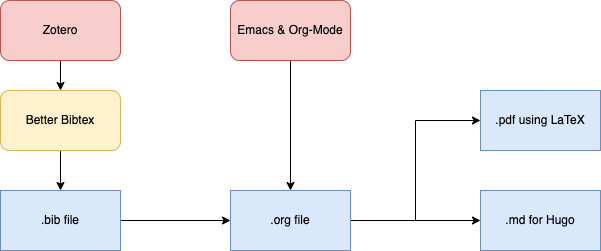
Figure 1: A visualization of all the components required for my writing setup.
Basic Setup
If you are curious and want to try this setup out for yourself, you can do so fairly easily. I prefer to use the Doom Emacs configuration framework for Emacs and I can highly recommend it.
GNU Emacs Installation
Of course your way of installing Emacs highly depends upon which operating system you run. For macOS Emacs-Plus lets you install Emacs with Homebrew.
| |
If you run Linux I recommend compiling Emacs yourself. With Debian you can use my configuration shown below.
| |
Both methods ensure that an Emacs is used that has the native compilation feature enabled. The native compilation feature generally speeds up Emacs significantly.
If you are on Windows your best bet is to try WSL with X11 forwarding. I can recommend this setup guide.
Doom Emacs3
Emacs can be intimidating to configure. Doom provides pre-configured modules that bring great functionality out of the box. To install Doom Emacs you can just run these two commands:
| |
Setup Citations
Lets first setup citations and install the already mentioned org-ref and ivy-bibtex package.
To do this we need to append both lines below to our packages.el (~/.doom.d/packages.el) file.
| |
If we run doom sync now, Emacs will download org-ref and install it automatically for us.
Of course, we also need to tell org-ref where our bibliography (.bib) file is located at.
In my case I told the Better Bibtex plugin for Zotero to store all my references in my Dropbox.
| |
org-ref can now load the bibliography file we specified, and we can insert citations via the org-ref-cite-insert-ivy command.
To conveniently insert citations into your Org files we can assign a keybinding.
| |
Now we can just type C-c ] to insert a citation into our .org file.
The last thing we need to add to the file is a link to the bibliography we are going to use for exporting to PDF or Markdown.
We can do so by including bibliography:<path> at the bottom of our org file.
#+TITLE: Demo

Information [[citep:&zhang2020secret]]

bibliography:~/Dropbox/Books/references.bib
Using Footnotes
To use footnotes in your text you can use the some text[fn:<key>] syntax Org uses.
The content of all footnote is defined under the chapter * Footnotes.
some text[fn:footnote1]

 * Footnotes
 [fn:footnote1] footnote content
This footnote syntax is native to Org and well supported across different export-engines.
Figure 2: Export footnotes to PDF and to Markdown (Hugo).
Latex/PDF Export
To be able to export to PDF via \(LaTeX\), we need to use some packages in the Org header of your .org file.
Mainly natbib to provide citation styles like for example citep or citet.
We could manually add the package as a LATEX_HEADER in each file like this:
| |
I prefer to add the package by default to all Org files as soon as you want to export to Latex.
We can achieve this by overriding the default article latex class in your config.el file.
| |
To finally export the PDF and open it, invoke org-export-dispatch with C-c e l o.
Hugo Blog Export
Hugo is a software for generating static web pages.
I use Hugo for this Blog in combination with the Zzo Hugo theme.
Hugo can generate HTML from Markdown files and the ox-hugo Emacs package allows us to export Org to Hugo supported Markdown.
We need to enable the +hugo submodule in the ~init.el configuration file.
| |
The Markdown files of your articles are stored in the /content subdirectory of your Hugo project.
Because our sources are not Markdown files but instead Org files,
we need to create a second /content-org subdirectory.
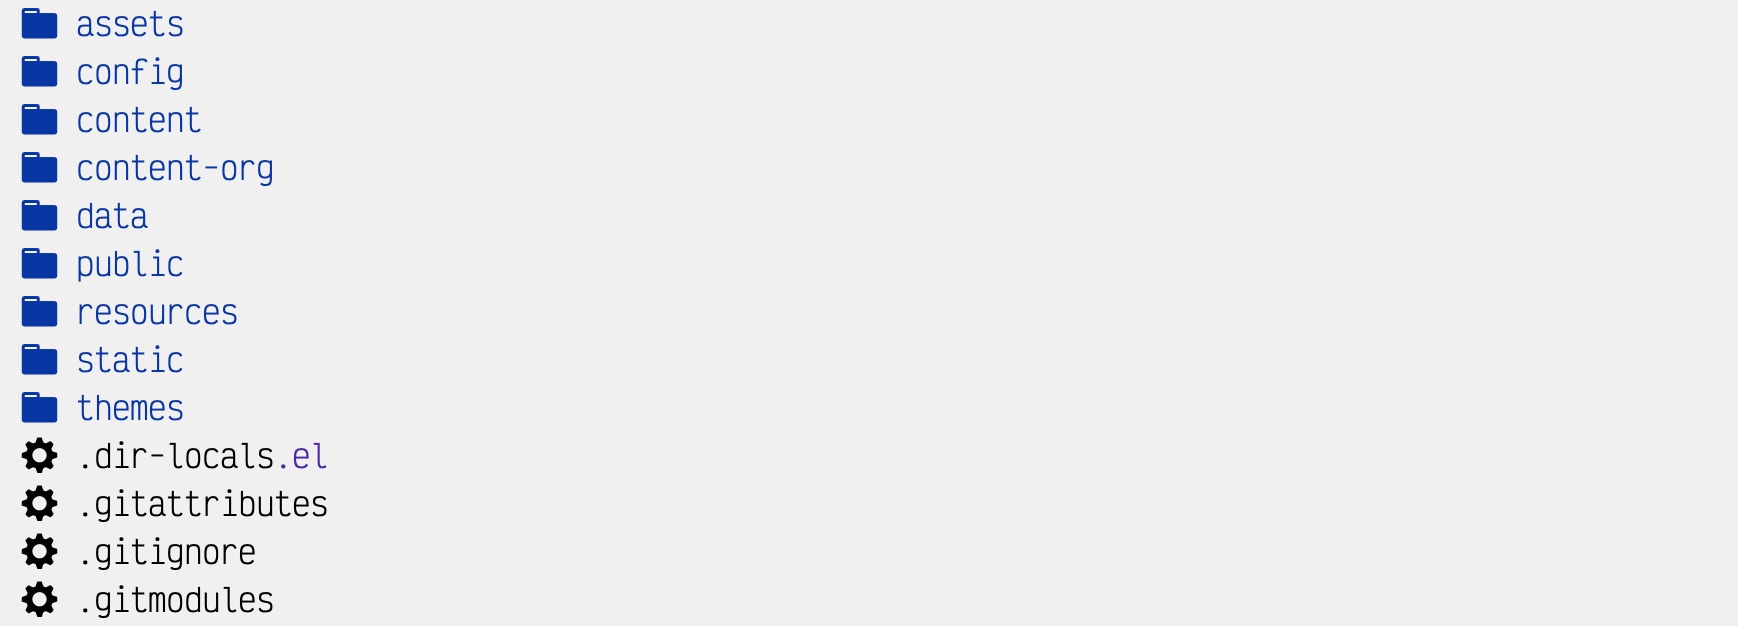
Figure 3: Example Hugo project structure.
Each blog article should have its own folder in the content-org directory.
Local images you reference in your Org files should be in this directory as well.
Creating a Blog Entry
Lets create a new blog article called Demo under /content-org/demo/Demo.org.
Each Org file requires the HUGO_BASE_DIR to be specified.
| |
To define custom front-matter you do some by using the hugo_custom_front_matter argument.
| |
To export the .org file you are currently viewing you can use the M-x org-hugo-export-to-md function.
Enabling Auto-Export
To enable export on-save you need to create a .dir-locals.el file in the project root directory.
| |
Let’s see how all it all works together.
Figure 4: As we can see even multiple citations styles are supported.
Nice to Heave Features
Spell Checking
To not miss any accidental typos a spell-checker is almost a necessity for any writing application. I typically write in German and English even sometimes in the same document. Therefore, I need a spell-checker that is able to check both languages simultaneously. Luckily Hunspell provides me the ability to do exactly that. Doom provides almost all necessary configuration as a module.
| |
To install Hunspell and the optional language packs you can do so with apt on Debian.
If you are running macOS, installing language packs is a little more complicated, see here.
| |
| |
config.el and replace the language codes with your choice.Languagetool for Grammar Checking
For simple grammar checks you can use Languagetool to check text in your Org buffer.
Enable the grammar Doom module and add Flycheck integration to your packages.el configuration file.
You also need the Languagetool executable languagetool-server.jar4, you can download here.
Optionally you can use the commands below to install Languagetool 5.6 to your home directory.
| |
| |
| |
packages.el file. | |
flycheck-languagetool for your system. You only have to replace <PATH> with the path to the downloaded languagetool-server.jar and you are good to go.There are still a number of issues you will encounter when using Languagetool with Emacs and especially org-mode. For example source blocks get analyzed by Languagetool which will inadvertently result in a number of emitted warnings. I personally think Languagetool still is a very useful addition to any Emacs writing setup.
Grammarly
You can even use Grammarly if you don’t mind potential privacy issues that come with an online service. An account for Grammarly isn’t necessarily required if you don’t want to use paid features. There are wide selection of frontends available for Grammerly:
- Flycheck: https://github.com/emacs-grammarly/flycheck-grammarly
- LSP: https://github.com/emacs-grammarly/lsp-grammarly
- Eglot: https://github.com/emacs-grammarly/eglot-grammarly
Please refer to the specific repositories and the corresponding setup guides.